I'm not exactly sure what I planned to accomplish with 30 days of crafts...
Maybe I thought it would be a good way to draw people in? Yah, and then what? I get sponsored and make blogging my life?
Well, that's not going to happen, and even if it did, I don't have time to make blogging my life because I have a regular job that actually pays bills. So then, for you loyal readers i.e. Mom and Amy, I am going to return to my regularly scheduled blogging.
Here is why:
1. Today I had 106 unread blogs sitting in my reader. Do you know what 99% of them were? USELESS. They plug their sponsors too much or talk about things that I really don't care about (like parenting or going to Disney).
2. All of those bloggers who get paid to do it are stay-at-home Moms. Though I'd like to stay at home, I can't... I have Verizon wireless bills to pay.
3. No one actually makes the stuff they see on the blogs. I mean seriously... I must have viewed a million blog postings and only ever copied like 10 things. Most of the time I don't even read the directions... it's not in my nature to follow directions, so I shouldn't be giving them either.
4. When you force yourself to craft, it's not fun at all.
5. Everyone wants eye-candy, so I'll give it to you when I have it, but I'm not going to force boring things on you.
6. There are like 9 million dishes in my sink. How is that even possible?
7. I like my fix-it-up projects more than I like making something from nothing... and 30 days wasnt all about fixing.
8. I spent a large part of my $100 budget at target today buying festive pillows and ornaments... also i bought another cardigan, because clearly, I don't have enough.
9. Christmas gets ruined enough by Dan being the world's biggest scrooge (Why do we have to set up decorations? Excuse me, we...?) I don't need to ruin it more by forcing myself to make crafty things.
10. Sometimes, you go to work on Monday after a long weekend and the world just gives you negativity. And it makes you mad and annoyed by lots of things, including your own outlandish ideas to blog all the time.
So then, there you have. 30 days are over. I'll be doing things and I'll post them when I can, but let's be serious, who was I kidding?

Monday, November 28, 2011
Monday, November 21, 2011
30 Days: Day Six - a Hostess Gift
This post is really two thoughts in one....
First Thought:
One of the best things about the Holiday season is the festive parties. Everyone gets dressed up, listens to some classic Holiday party music and proceeds to get both merry and bright. You have to love it. But one of the struggles of attending so many parties is coming up with a decent hostess gift. While dish towels and ornaments tend to be over-gifted, a good bottle of wine usually does the trick... but it's common. How can you get your $7 bottle of wine to look better than the showoff's $30 bottle?
Second Thought:
Sometimes, I see adorable wine cork art and instantly fall in love. As it just so happens, I have an insane amount of corks because people have been saving them for me for the last few years... But not everyone has that kind of stash on hand. I understand. That's why this adorable little "icing on the cake" hostess gift only requires 3 corks.
We could go through that much wine in about 2 hours with my crazy family.
So here is what you need to make your bottle look like the best hostess gift ever:
Supplies:
1. 3 wine corks, preferably with red wine stains on the cork
2. A Hot glue gun. If you don't have one, you should probably stop reading this blog, because I don't do anything without mine.
3. Ribbon
4. A decent knife

Steps:
1. Cut your 3 corks in half. I found that it's pretty easy to do when they are dry.


2. Take 1 of your halves and cut it in half again.
3. Hot glue your corks together in the shape of a Christmas tree. Use one of the 1/4 corks in the middle of the bottom row. Be sure that they all appear level from the front (even though they are probably different sizes).


4. Pick a festive ribbon to go around your tree, and hot glue it in place.

5. Use the remaining 1/4 cork as the stump and glue to the ribbon.

6. I added a ribbon to the top of my tree, but any fun kind of embellishments you come up with would work real well.
7. Create a loop so that you can hang your tree around your $7 bottle of wine that tastes exactly the same as the $30 bottle.

8. Accept compliments graciously when your hostess gift turns everyone's head at the next Holiday Party.

Oh yah, don't forget to keep eating the candy out of your countdown calendar when you finish a craft!
Sunday, November 20, 2011
30 Days: Day Five - Quick Centerpiece & Ms. Picky Pants
Back in the day, long, long ago when no-one had blogs, I went to high school.
Some things in High School are absolutely best left in the past.. but there is one particular day I will never forget. It involved the Mr. back before he knew what he was getting into by dating (and the subsequently, marrying) me. It was the early spring of our Junior year, and we had just gotten out of softball/baseball practice and were volunteering for Dollars for Scholars that night. Mr. was a bit more charming back then, and a lot more coy... so in a very roundabout way, he invited me to his house for dinner before we would come back to school and do our volunteering together.

My poor Mother-in-law, had no clue I was coming, and Mr. never bothered to ask if it was ok... but she didn't care. In fact, I think she never really knew how many would show for dinner, so she always just planned for extras. She still does that even though none of her kids live there right now. Anyway to get back on point, we were headed there for dinner and she had made chili.

Ms. Picky Pants (aka me) did not like chili. She did not like anything really, and it didn't matter that Ms. Picky Pants had never even tried things that she declared she hated. But on that particular night, Ms. Picky Pants had no choice, because there she was, meeting the parents for the first time ever, and arriving completely unannounced.

So I had the chili... I loved the chili.

And now, I frequently get chili cravings... today being one of those days. But the best thing about chili (aside from the taste) is how easy it is to make. So for you, today... my chili recipe.
2 cans (14 oz?) delmonte petite cut diced tomatoes with zesty jalapenos
1 yellow (or red) onion
1 pkg McCormick's Hot Chili mix
1 can Goya kidney beans
1.5 lbs ground beef, turkey or chicken depending on what you like.
Very straight forward: saute the onions, brown the beef (tonight was chicken), add the the rest of the stuff and cook on low for about an hour.
EAT.

Then, use the cans to do something crafty. Tonight I covered the cans in old cable knit sweater sleeves, added some ribbon and stuffed greens inside. Almost as simple as making the chili.


You're welcome for these time saving, up-cycling ideas - and for the delicious chili recipe. But if you really want to thank someone, it should be my mother-in-law for introducing me to this delicious dish. Now if only she could get me to like fish!


Saturday, November 19, 2011
30 Days: Day Four - Wreath Making
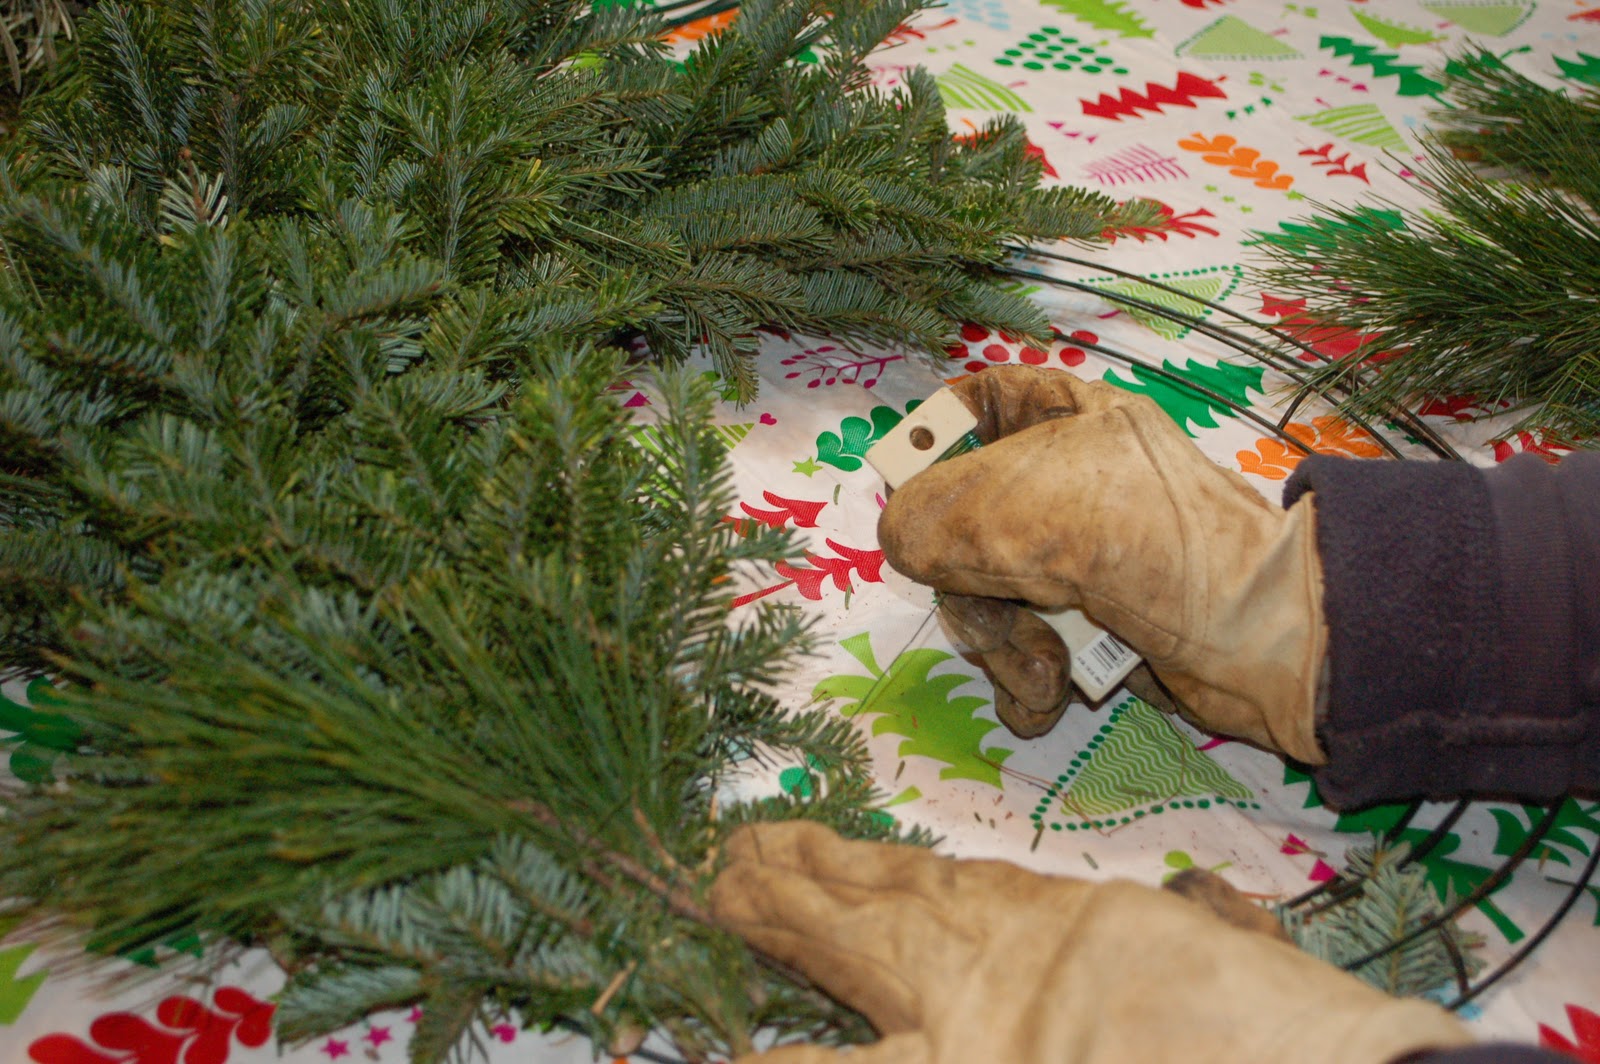
Every year for the past 4 years or so, my Mom hosts a wreath making party. All the ladies in the family come over and make their own beautiful wreath chock full of greens. Its always a lot of fun to see how different they all are, and how styles change from year to year.
Due to a prior commitment (UConn Football) I am unable to attend this year's festivities. However, I did hang out at my Mom's all day yesterday making wreaths so that I could post this for you today! There are no instructions, because it's fairly simple... cut some greens and wire them to a wreath form, but I will add a list of the supplies that we have, just in case you want to throw your own wreath party. Christmas Music and Wine are optional, but highly recommended.
Supplies:
Greens of all varieties, because if the storm this year, we were able to have a ton of stuff including cedar, pine, balsam, holly and some other Christmas looking greens that I can't identify. If you didn't happen to have a storm that brought tree limbs to your front door, then you can always just buy a Christmas tree and split up the cost. One tree will probably make 4 wreaths.
Wreath Forms
Floral Wire (a lot of it!)
Wire clippers
Branch clippers (pruners)
Work Gloves!
Pine cones, Christmas Bulbs, etc.
A Pretty Bow.
Now, for your viewing Pleasure:


Thursday, November 17, 2011
30 Days: Day Three - Snowball Cookies & a Playlist
I should have posted about Day Three yesterday. I mean, that would have been the thing to do. But it's hard to get into the Christmas Spirit when you get home at 9, full of coconut lime margarita and tired.
What? Like you don't occasionally have margaritas on a Wednesday night? Well in my defense it was my brother-in-law's birthday.
But I think that it reminded me what is really required to get in the Christmas Spirit: cookies and music.
So tonight when I got home from work, I started to make my favorite Christmas Cookies: Snowballs.
Ingredients:
1/2 C Sugar
3/4C Butter
2 t Vanilla
1 Egg
1 C Chopped Nuts (optional - I used walnuts)
16 oz chocolate chips
2 C Flour
1/2 t Salt
Powdered Sugar

Instructions:
1. Pre-heat oven to 350, and line baking sheets with parchment paper.
2. Combine sugar, butter, vanilla and egg.
3. In a separate bowl, combine flour and salt.
4. Add dry ingredients to the wet portion gradually and mix in nuts and chocolate chips.

5. Using a cookie baller (you know, a real small ice cream scoop) scoop dough into little balls and put on baking sheet.

6. Depending on your oven, and the type of baking sheet you use, cook for 10-12 minutes and let cool.
7. Once thoroughly cooled, place cookies inside a ziplop bag of powdered sugar, and shake.
8. And like Magic, you have snowballs in your house that will never melt.

They will get eaten though, so make sure you have a few! And if you aren't in the mood yet, just download some of my favorite songs:
- Merry Christmas Baby: Bruce Springsteen
- Santa Claus is Back in Town: Trisha Yearwood
- All I want for Christmas is You: LeAnn Rimes
- Please Come Home for Christmas: the Eagles
- Oh Holy Night: Celine Dion
- Better Do it Right: Smashmouth
- Santa Claus is Comin' to Town: Bruce Springsteen
- Christmas Baby Please Come Home: Darlene Love
- All I want for Christmas is You: Mariah Carey
- Last Christmas: Taylor Swift
- Gee Whiz, it's Christmas: Carla Thomas
- Rockin Around the Christmas Tree: Brenda Lee
- Step Into Christmas: Elton John
- Jingle Bell Rock: Brenda Lee
- Mele Kalikimaka: Bing Crosbie
- You're a Mean one, Mr. Grinch: Jim Carrey
- Run, Run Rudolph: Chuck Berry
- Little Saint Nick: Beach Boys
Of course, there are many more fantastic songs, but those are some of my favorites! Hope Day Four's post finds you more in the spirit!

Tuesday, November 15, 2011
30 days: Day Two - PB Twig Snowflake
Question: What says "Winter Wonderland" more than a snowflake?
Answer: Nothing.

I purchased a twig snowflake from Pottery Barn recently. It was expensive, of course, but I decided it was a necessary evil if I were going to pull off the Winter Wonderland theme inside and out of my house. The snowflake arrived, oddly enough, about the same time Winter Storm Albert did. Next thing you knew, our backyard was full of material for my very own twig snowflake.

As you can see, I had a lot of material to choose from. However, what I found to work best of all, were the little flexible twigs from birch trees. So if you want to save yourself roughly $45*, please... read on.
Materials:
1. Lots of twigs, preferably birch (because they are flexible and easy to work with).
2. Stem Wire (we used a 16 gauge, 18 inch type)
3. Floral Wire
4. Pruning shears to cut the tiwgs
5. Wire cutters to clip the wire
6. Sticky Tape (we used thick floral tape, but the silver duct variety would work as well)
7. A freak snowstorm that causes all of the trees to fall thus putting materials on every street corner.


Steps:
1. I started by stealing a number of birch limbs from one of my neighbors. To be clear, it wasn't really stealing, because they were out on the curb waiting to be made into wood chips.
2. Clip as many twigs as you can off of the limbs. For ease, you should plan to NOT use anything fatter than the cable connecting your mouse to your computer. I want to say that we needed to fill about 15 pint glasses full of twigs for the whole project.
3. Using the stem wire, create a circle, and tape the ends together.
4. Decide on the thickness of your flake, and start securing the twigs to your circle by wrapping them with floral wire.


5. Once your circle is complete it's time to work on the actual arms of the flake. Using the same tecnique, wire twigs down to the long stem wires. I used 4 pieces of stem wire for this step. Two pieces of which, I cut in half, to make them easy to secure to the circle in step 7.
6. To add the little fingers, I simply wired a group of twigs together (no stem wire necessary here) and then broke them in half to create a V. Do this for each of the "arms".

 |
| They look like pitchforks! |
7. Starting with your two longest arms, write them to your circle with one arm on top and one on the bottom forming a cross.

8. Wire the little arms to the circle and to the big arms, creating a sort of star-burst.

9. (Optional) The PB snowflake has lights on it, and if you wanted to add them, this is when you would do it. Make sure that your male end of the plug is far enough away from the flake that you can actually plug it in when you are done!
10. (Optional) I added wired berries to my flake to give it a more woodsy feel. I did not add lights to mine because I didn't want them. Looks great doesn't it?

11. Reward yourself with candy! You did it again! (also, this was a time demanding project, so if you need more candy, you deserve it).

Total Cost: $0.00, I had everything already
Remaining Budget: $96.25
*You can't actually buy these from PB anymore, they are sold out.
Monday, November 14, 2011
30 Days: Day One - Candy Countdown Calendar
Remember when I promised you a craft, and then in my next post, said I didn't have one?
Remember when I told you never to believe anything I say?
This is going to blow your mind... Today is day one of the thirty days to a Winter Wonderland.
I know, I know... I bet you thought I wouldn't do it, didn't you? Guess that will teach you to never underestimate the element of surprise! So then, without further delay, here is the first craft that I produced on my path to a Winter Wonderland.
There is a reason why the first project is a candy calendar. In fact, there are two: #1: Candy is cheap after Halloween thus leaving a sizable amount of my budget in tact. #2: You are working hard on these crafts (you know, if you do them) so after every craft you complete, boom: candy reward. Feel free to hang this calendar in your craft space, so that no-one else knows you have candy available.
To begin, here are my materials... aside from the candy, I already had everything:
1. 12 Muslin Tea Bags - Mine came from the Atlantic Spice Co.
2. Spray Adhesive
3. Cardstock for use as stencils
4. Cardboard
5. Paint - I used wood paint, but Fabric Paint would also work well
6. Stamps, embellishments
7. Candy
8. Cricut to cut stencils (or you could free hand with a sharpie, or use an actual stencil)
9. Yarn or Jute to hang the finished product.
10. (optional) Goo Gone to clean the spray adhesive off your hands because you are a messy Marvin.

Steps:
1. I used the cricut to cut out stencils for me. I used a 2" scale and that worked perfectly. If you wanted, you could freehand the numbers with a sharpie, or paintbrush... my hand isn't steady enough for that, but if yours is, skip down to step 5.
2.After cutting the numbers, I used the spray adhesive to get them sticky (remember to do this on the WRONG side of the stencil). Once you affix the stencil to the bag, you should wait a minute or two, making sure it stuck in all the right places. Keep in mind that you must spray down the o's inside your 6, 8, 9, and 10's, or you will end up with a snowman for an 8.

3. After stuffing each bag with a piece of cardboard to keep the paint from seaping through, I dabbed on the paint, little by little with a sponge brush. For a more distressed look, you can use less paint to achieve a worn, antiqued feel. I let this dry overnight, so that the paint wouldn't seep out, but you could hurry the process along by using a hair dryer or something.

4. Remove the stencils carefully.
5. Voilà! You now have numbered bags!

6. Jazz up your bags with stamps, rhinestones, stickers, iron-on snowflakes, whatever you have that goes with your theme. I wanted mine to fit in with the whole winter wonderland thing, but you could just as easily make it Scandinavian, red and white, Whoville, Christmas Plaid, whatever you want. The point is: get creative and use things that you have on hand.


7. Fill! Use that candy I told you to buy on November 1st, and fill 'em up. As much as you want. Keep in mind, there are 30 days to a Winter Wonderland, so you'll want to pace yourself in order to maintain your candy stash (hide in a sneaky spot away from kids and dogs and husbands - try underneath a bag of frozen veggies in the freezer... you know that no-one is lifting those up!)

8. To hang your bags, use something strong: Jute, thick yarn, you get the idea. Keep in mind that the weight of the bags will make your "rope" slack, so when your first secure your rope, keep it taught. If you have a mantel, that's a great place! If the only open space happens to be a bookshelf in your craft room, that's fine too.

9. I spaced my bags 2-3 inches apart, but I'm nearly 100% certain it does not matter at all.
10. Stand back and marvel at the cuteness. Take a picture, post it online. Reward yourself, day one is done!

Total Cost: $3.75
Remaining Budget: $96.25
Subscribe to:
Posts (Atom)